
Looking for a fun and easy science experiment to do with your little ones? My son absolutely loves making fizzing rainbows, and even the baby gets a kick out of watching the colorful eruptions! This experiment is always a hit in our house. Whenever my son needs something fun to do and I don’t have anything prepped, I always turn to this quick activity.
It’s simple, exciting, and perfect for keeping toddlers entertained and curious. Plus, it’s a great way to sneak in some basic science concepts. Whether you’re looking for a rainy day activity or just something new to try, fizzing rainbows are sure to satisfy your child’s boredom!
If you like this experiment, you’ll love our fizzing ice cube activity and our fizzing colors activity!
Disclosure: Some of the links below are affiliate links, meaning, at no additional cost to you, I will earn a commission if you click through and make a purchase.

Materials Needed

Here’s what you’ll need to create your fizzing rainbow science experiment:
- Baking sheet or tray
- Baking soda
- Vinegar
- Dish soap
- Eyedroppers
- Test tubes or small containers
- Food coloring
I use these eyedroppers that are the perfect size for toddler hands. My son loves using them, and even my baby likes to chew on them! They make it easy for little ones to control the amount of vinegar they add, which is a big part of the fun. My son started using these when he was about 2 or 2 and a half and had a little trouble with them at first, but by the end of the experiment he could use them like a pro!
The test tube kit I got is also perfect for toddlers. It comes with 10 tubes, so you can test out all kinds of color combinations and reactions. The size is just right for little hands to hold and experiment with!
If you like this experiment, check out our surprise colors experiment!
The Secret to Bigger Reactions

You’ve probably done baking soda and vinegar experiments before, but have you ever added dish soap? The secret to creating bigger, foamier reactions is to add a drop or two of dish soap. When you combine baking soda and vinegar, the dish soap traps the carbon dioxide gas produced, resulting in a much larger and foamier eruption. Simply add a bit of dish soap to each test tube or container along with the baking soda and vinegar, and get ready for some big foamy eruptions!
How to Make Fizzing Rainbows
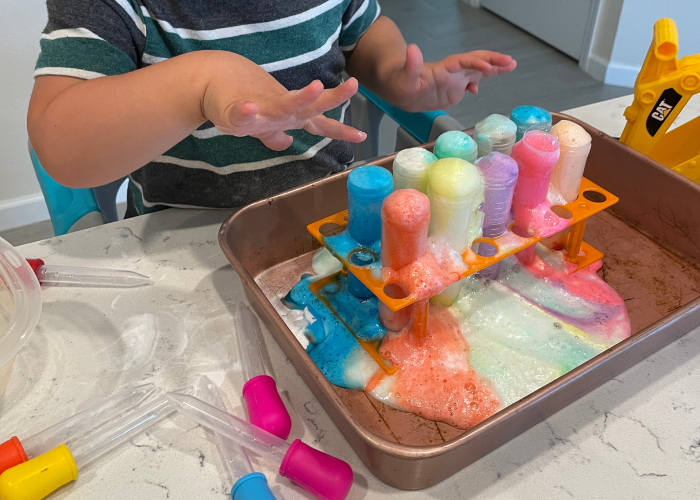
- Prepare the Test Tubes: Add about 1 teaspoon of baking soda to each test tube or small container. Put the test tubes on a baking sheet or tray to help contain the mess.
- Add Color: Add a few drops of food coloring to each test tube for vibrant, colorful eruptions.
- Enhance the Reaction: Add a drop or two of dish soap to each test tube to make the reaction bigger and foamier.
- Get Ready to Fizz: Pour some vinegar into a separate container.
- Start the Fun: Have your child use the eyedroppers to add vinegar to each test tube and watch the exciting reactions!
Enjoy watching the colorful, fizzy eruptions together! If you like this activity, try our fizzing colors activity!
Variations to the Experiment

There are plenty of ways to mix things up and add more fun to your fizzing rainbow experiment:
- Color Mixing: Try combining different food coloring drops to see how the colors mix and create new shades during the eruption.
- Glitter: Add a pinch of glitter to the baking soda for a sparkling reaction that adds an extra element of magic.
- Scents: Add a few drops of kid-safe essential oils to the vinegar for a fragrant experience.
- Large-Scale Eruptions: Use larger containers and increase the amounts of baking soda, vinegar, and dish soap for a bigger, more dramatic reaction.
- Toy Eruptions: Place small waterproof toys in the test tubes or containers to see them get “erupted” out with the foam.
- Temperature Experiment: Use cold and warm vinegar to see if the temperature affects the reaction speed and intensity.
How Kids Can Help and What They Can Learn

Involving your kids in this fizzing rainbow experiment is not only fun but also educational. Here’s how they can help and what they can learn:
- Measuring Ingredients: Let your child measure out the baking soda and dish soap. This helps with math skills and fine motor coordination. For little kids, this helps with fine motor skills. We also like to count our scoops as we pour it into the test tubes.
- Adding Colors: They can choose and add the food coloring to each test tube, allowing them to explore color mixing and creativity. For littles, this is great color identification practice.
- Using Eyedroppers: Have them use eyedroppers to add vinegar to the test tubes. This helps improve their hand-eye coordination and fine motor control.
- Observing Reactions: Encourage your child to watch the reactions closely and describe what they see. This helps with observational skills and curiosity about chemical reactions. My son likes to touch the foam and we talk about how it feels on his hands (foamy, soft, wet, etc.)
- Cleanup: Involve them in the cleanup process to teach responsibility and the importance of taking care of their workspace. My son loves water play and helps wash out the test tubes at the end of our experiment.
Clean Up
To make clean-up easier, remember to put the test tubes or containers on a baking sheet or tray to help contain the mess. While the experiment itself is easy to clean up, be aware that the food coloring may stain a little. When we did this experiment, the food coloring got on our quartz countertops, and I had to really scrub to get it off. Next time, I’ll definitely put a towel or something under the tray as well to protect the surfaces. Other than that, just rinse out the test tubes when you’re done and that’s it!


Leave a Reply